I was asked this question today on the Pentax Discuss Mailing List:
"I'm curious what qualities you expect from this that you wouldn't get from a careful normal multi-exposure, perhaps with a panoramic head … perspective correction?"
I thought it was a good question, and so here is my (fairly long) response. Feel free to correct any errors in my thinking
In a nutshell it is the technological differences between starting with a spherical image vs a flat image, when the end result must be flat.
There are two sides to producing a panorama image: Taking & Making, so lets consider the differences on both sides.
On the Taking side, what you call "normal" panorama is rotating the
camera around the center point of the tripod stalk (rotational panorama). To do it properly, you need to position the nodal point of the lens over that rotational point. If you simply rotate around the tripod hole on your camera
body, you are going to have problems with objects that are closer to
your camera. As you mentioned, it also helps to have a pano head. The
HippoCam does not rotate, so there is no concern over finding the nodal point of a lens and no equipment needed to position that nodal point over the rotation point of your tripod. Instead the camera is traveling in a plane over the 6x7 image circle, with some overlap to allow the stitching.
Now think for a moment about the image quality that the sensor receives from a lens designed for the size of your sensor, vs a lens designed to cover a 6x7 negative size. In your "normal" method you are working with a lens that normally sacrifices some quality at the corners. So a "normal" panorama image has overlapping weak corners at each "seam" of the process. By using a
larger format lens the weak corners aren't even being sampled. The
APS-C sensor is sliding right across the middle of the 6x7 image
circle. (One could also effectively minimize this doing "normal" rotational panoramas on an APS-C sensor by using 35mm "full frame" lenses in which your smaller sensor size is also eliminating the corners.)
That brings us to the making part. In the "normal" panorama process
you have to do two things: stitch and then distortion correct.
First let's talk about the stitch. Here's an example of a simple stitched image: http://www.altostorm.com/images/corrector/sample_1_original.jpg
Two things:
As you know if you have ever produced a normal pano like this, you
know that it wasn't rectangular like this. The original image was a
bowtie shape. You had to crop off pixels to get to the USABLE
rectilinear area. In short there is pixel "waste" or cost. You have in
effect used a much smaller part of your sensor (especially vertically)
than you started with.
Secondly, depending upon the focal length of the lens you used to take
the individual pano frames, you know that there are often problems
that creep in on parts of the image at the blends. These are called
"stitching artifacts". These things can "give away" the fact that an
impressive looking image was made up of segments. This is generally
not critical for making web-resolution images, but if you want to make
bigger wall sized prints from your images those things have to be
dealt with in some way.
The HippoCam/Rhinocam™ stitching process is much easier technically because we are not stitching spherically, but only "flat stitching". It is a
completely different process in Photoshop. In theory the pixels should
PERFECTLY OVERLAP from one frame to the next (as opposed to an
algorithm that must BLEND spherically distorted pixels in a pleasing
way). No stitching artifacts are introduced into the process. And you
throw away no pixels. Assuming the HippoCam is level, you should lose
very few pixels vertically and get to use almost the full 23.7mm of
sensor width in the vertical dimension.
Now, let's talk about the distortion correction phase: How do we magically go from this: http://www.altostorm.com/images/corrector/sample_1_original.jpg
to this:
http://www.altostorm.com/images/corrector/sample_1_corrected.jpg
???
Think about it. Either the pixels on the extreme right and left had to
stretch apart (did the software interpolate pixels to fill that space
in a way that made sense?) OR ELSE the center had to shrink to match the
outside edges - which means again "throwing away" pixel information
(which equals a loss of resolution).
Anybody who has ever tried to up-size a jpeg knows that there is a cost of sharpness and resolution to do so. No algorithm can reproduce information it doesn't have. The best it can do is guess and the end result is something that is very clearly inferior to our eyes.
If you eliminate the need for distortion correction in the first place
(as the HippoCam/RhinoCam method does) you eliminate the corresponding
loss of resolution.
We haven't even talked about DOF issues when comparing a spherical
image to a panorama made from taking images across a single flat image
plane.
All of this is just theory talking however. We'll hopefully see if it
works in practice and I can do some comparison shots both ways.
Thursday, August 22, 2013
Tuesday, August 20, 2013
Pentax HippoCam: Parts is Parts
Here is a sneak peak at the parts I'm using to build my (version 1) Pentax HippoCam, which is based on the Fotodiox RhinoCam™.

To fill that gap, I will be using a piece of black foam sheet that will be sandwiched between the front and rear plates. It will probably be affixed to the backside of the front plate (the non-moving part) with spray adhesive. These 12' x 18" foam sheets (called "Silly Winks Foam Sheets") were found at my local Hobby Lobby store and cost under $1 each. I bought two sheets, one 2mm thick and the other 3mm thick. The 3mm will need to be compressed a bit, but will be used if I can still get the backside plate to slide easily, since it will provide better sealing.

The main components are:
• Front plate (bears the Pentax 6x7 lens)
• Front plate (bears the Pentax 6x7 lens)
• Rear plate (bears the ground glass for composition and the PK mount for camera attachment
• A mechanism that allows for the sliding of the rear plate for positioning either the ground glass or the camera behind the image circle
• A material that prevents light leaks into the optical path
• The lens receptor mount taken from the Pentax 6x7 body
• A material that prevents light leaks into the optical path
• The lens receptor mount taken from the Pentax 6x7 body
• The ground glass from the Pentax 6x7 body
• The prism from the Pentax 6x7 body
• A PK mount that will stand off the rear plate to hold the camera sensor at the proper flange to sensor distance.
• A PK mount that will stand off the rear plate to hold the camera sensor at the proper flange to sensor distance.
• (not shown) A way to hold the ground glass and prism that will also stand off the rear plate to facilitate image composition
• (not shown) A way to mount the whole enchilada on a tripod
Wandering around my local Menards (home improvement store) with an eye to finding components, I spied these cool little bamboo breadboards. They are approximately 1/4" thick and strong because they are made up of bamboo strips that are tongue and grooved on the ends. In addition to strength to weight ratio, the bamboo is smooth and slick, and low friction is one of the things I'm looking for, since the back plate must slide back as the overlapping images are taken (and also to position the ground glass over the lens opening).
I decided that I would have the fewest alignment issues if I made the front plate and the back plate be in contact with each other (or nearly in contact).
The back plate will slide in the aluminum trim channel that was made for 1/4" plywood (which is dimensionally a bit under 1/4"). This will be cut into two equal sections that will be mounted on the backside of the front plate. The rear plate will then slide into these channels from the side and be able to move horizontally.
I considered making a rabbet or dado in the backside of the front plate to accept the aluminum trim channel, but decided instead to simply bolt it on with no rabbet or dado. This means that there will be a gap between the front plate and the back plate that is equal to the with of the sidewall of the aluminum trim channel (approximately 2mm).
To fill that gap, I will be using a piece of black foam sheet that will be sandwiched between the front and rear plates. It will probably be affixed to the backside of the front plate (the non-moving part) with spray adhesive. These 12' x 18" foam sheets (called "Silly Winks Foam Sheets") were found at my local Hobby Lobby store and cost under $1 each. I bought two sheets, one 2mm thick and the other 3mm thick. The 3mm will need to be compressed a bit, but will be used if I can still get the backside plate to slide easily, since it will provide better sealing.
In the photo above, I've simply set the 6x7 ground glass and a m42/PK adapter in the approximate positions of where the real components will go. The PK mount will probably be made from a old PK 2x teleconverter. It will need to stand off of the back plate approximately 12mm to allow me to twist on the Pentax K-5 II (with its protruding prism and grip). The total flange to sensor distance must equal that of the original camera, which was 80mm.
The ground glass holder is a bit up in the air. I originally planned to use the original ground glass holder from the original camera, but this will require some serious sawing and machining of the piece. I may still do that (I work for a machine shop, although I'm not a machinist) or I may decide to design a simpler box that accomplishes the same purpose. The original Pentax 6x7 prism will be held in the holder by mechanical means, perhaps as low tech as a bit of elastic affixed to the back plane. The eyepiece will point upwards and composition can then be done without a dark cloth (as is necessary with the prism-less Fotodiox design.
Shown in the photo is my Super-Multi-Coated Takumar/6x7 200mm f4, however I plan to use this mostly with a Pentax 6x7 55mm f4, which should be arriving tomorrow.
Various "Flavors" of Panoramic Photography
Most of us are introduced to the concept of panoramic photography by taking a tripod-mounted camera and rotating the camera taking a series of images that overlap. Software, like Microsoft ICE or other "stitching" software, is then used to calculate a pleasing blend of the images, making use of the overlapped portions of each image. Depending upon a number of factors (including whether the nodal point of the lens was used as the rotational center or not, the focal length of the lens, the distance to the subject, and the proficiency of the stitching algorithm) errors may be found. This type of panoramic photography is called segmented photography (for the image stitching) and also rotational photography (for the fact that the lens must be pointed in a different direction for each segment's exposure. If you think about the film plane you will see that it is curved around the rotational point, but that each segment is made up of a flat image plane (the sensor or the film is not curved).
There is also a "flavor" of panoramic camera that make use of "short rotation". This is used in cameras such as the Widelux, the Noblex, and the Horizon. These cameras have a lens that rotates during the exposure around the camera's rear nodal point and use a curved film plane. Rotating lens cameras produce distortion of straight lines and also must have a limited selection of shutter speeds to work with.
Ignoring "full rotational" panoramic cameras that can do 360 degrees (or more) let's go straight to the "fixed lens panoramic". Examples of this are the Fuji G-617 and GX-617 (for 120/220 film), the Fuji TX-1 and TX-2, and the Hasselblad Xpan cameras (for 35mm). They create a wide aspect ratio image with a single fixed lens and a flat image plane.
The Fotodiox RhinoCam™ (and my Pentax HippoCam) fall into a whole new hybrid category. They are fixed lens designs that also use the segmented (stitched image) approach, but instead of rotating the camera to point the lens in a different direction for each segment, (introducing rotational distortions) these hybrid cameras make use of lens designed for a much larger format and slide the digital sensor across the flat image plane, taking a series of overlapping images that can then be stitched into a larger, rotational-distortion-FREE images.
The secondary benefit of this approach (or maybe the primary benefit, depending upon your point of view) is that you are producing what could only be produced with a much larger (and expensive) digital sensor. Using my Pentax K-5 II as capture camera (a 16 megapixel sensor) and taking a series of 6 images across a 6x7 lens' image plane, the result should be an image in the neighborhood of 80-85 megapixels (image overlap means it is going to be less than 16x6 or 96 MP).
Light Fall-off & the Center Gradient Neutral Density Filter in the 90mm Fuji GX-617
Panoramic Photography, which produces panorama images, can be achieved in different ways. In general, panoramic photography is normally thought of as being wide angle photography (that is, with a field of view that is wider than what we perceive to be "normal" with our eyes). In addition, this effect is heightened by an image that is wider than the traditional 3:2 or 4:5 ratio of the image height to the image width. (This is speaking of a horizontally formatted panorama, which is the most common orientation - vertical panoramas are also possible.)
Taking a Fuji GX-617 for example. The widest lens available for this camera is a 90mm f5.6 SWD EBC
Taking a Fuji GX-617 for example. The widest lens available for this camera is a 90mm f5.6 SWD EBC
This lens was designed to cover a 5x7" negative and to do so in a camera that is capable of both swings and tilts. The diagonal of a 5x7 rectangle is 8.6". To allow those movements, it has to have an even larger-than-8.6" image circle. If we look up the specifications of this lens, we find that it has a 236mm image circle, which is a bit over 9.25".
Optical design is matter of choices and trade-offs. Large format lenses are concerned most with correcting for curvilinear distortion and lateral color. They achieve this at the cost of persistent light fall off. This means that more light is hitting the center of the image circle than the corners. With the 90mm GX-617, this affect is so pronounced that a special filter was required for film: a 2x neutral density center gradient. In effect, when you photographed with the lens set at f/11, the outside of the image circle was getting the full amount of light, while the very center portion was getting the light it would have received if the lens was set at f/16.
SLR wide angle lens design has to take into account a mirror that flips up and would strike the lens if it came too close to the film/image plane. For this reason, SLR lenses use a retrofocus design, which allows the exit pupil of (for example, a 6x7 lens with a focal length of 55mm) to be much farther away from the film plane than 55mm (where the reflex mirror would hit the back of the lens). A side benefit of the retrofocus design is that light fall-off is minimized (but not completely eliminated). You have never seen a center gradient neutral density filter needed for this reason on a 6x7 or 35mm SLR camera.
This is one factor that (I believe) makes designing a panorama camera around a 6x7 SLR lens is preferable to designing it around a large format camera lens. It is the main reason I chose to build the Pentax HippoCam around the Pentax SMC 6x7 55mm f4. (Pentax also made a 6x7 Takumar f3.5, which by all accounts seems to also be a very good lens, but it suffers from much greater weight and an almost impractically large filter size. (100mm filter size, meaning even a UV filter is going to cost you approximately $80. The f/4 design requires the much more common and affordable 77mm filter size.)
Monday, August 19, 2013
Design Objectives for my Pentax HippoCam
A while back, I became enamoured with Fuji's wonderful panorama cameras made for 120/220 film, the G617 and the later GX617. I found a seller on Craigslist and almost decided to purchase it. Besides the film and processing costs, if I wanted to do any digital post-processing it would require buying a scanner capable of scanning the negatives. (A scanner like the wonderful Epson Perfection V600 Photo, which even comes with a 6x17cm negative holder).
I also considered a panorama film camera which produces a similar aspect ratio on 35mm film, the Hasselblad Xpan™ (and later Xpan II™) which in turn led me to the Fuji 35mm offerings the TX-1 and TX-2. Besides again requiring the expense of film and processing and scanning, they are also pricey.
I guess that's why I was intrigued when I saw the Fotodiox RhinoCam™. It seemed like a way to get the same results as those cameras, but straight to digital (although requiring image stitching).
Therefore, my design for the Pentax HippoCam (at least Version 1) is to allow me to take a 6x17 aspect ratio (or something close) directly onto digital. The Pentax K-5 family sensor has dimensions of 23.7mm x 15.7mm. That means that if I orient the camera vertically and take 6 exposures, with an overlap of 4mm on each image, then I should end up with a stitched image of approximately 23mm x 74mm (23mm x 65mm would be exactly the ratio of a 6x17 negative).
You'll notice that my 74mm is actually longer than the original length of the 6x7 negative (70mm long). Whether that will actually be achievable or not, remains to be seen: Even if the image circle extends far enough the image quality at the edges may suffer to an unusable degree.
Next we will look at some of the pieces of this little puzzle (subject to change without notice).
Going RhinoCam™ One or Two Better....
I'm a Pentax guy meaning that, after some careful comparison, I decided to make my first DSLR a Pentax. The Number One reason was that Pentax has historically made their cameras backwards compatible with their lenses. In other words, I can put on my K-5 II body lenses from the Pz-1p autofocus film days (Pentax-F and Pentax-FA lenses). I can also put any of their K-Mount lenses (Pentax-A, Pentax-M, or SMC K). I can even, with a no-optical element adapter, use the superb Pentax Takumar lenses or other m42 screwmount lenses (of which there are MANY).
This was important to me because when I bought my first DSLR, I did not foresee being able to afford many of the $500+ autofocus lenses that were currently being offered on the *new* market. But I knew that I would want to play around with different lenses and this would be an inexpensive way to do it. I was right.
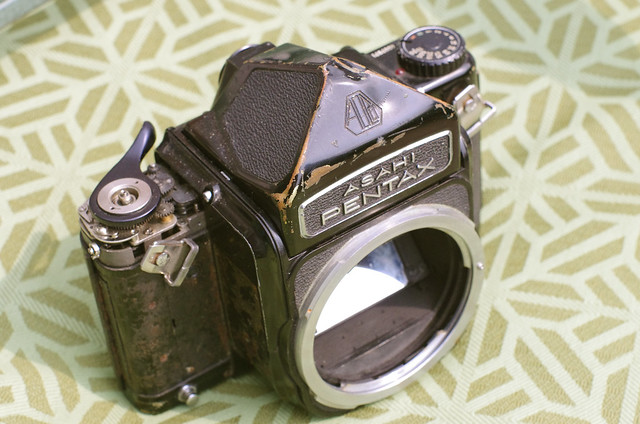
Along the way, I have accumulated a lot of various Pentax film camera kits, which were usually purchased for the lenses. I even decided one day to purchase a well-regarded Pentax 6x7 lens, the 165mm f2.8. With it came a hunk of junk that was formerly one of the original Pentax 6x7 bodies (no mirror lock-up) and a dented, but functional, prism finder.
With thoughts of the Fotodiox RhinoCam™ rattling around in my head, my eyes fell upon this neglected workhorse, in a box in my basement.
And that's when I realized that I was looking at almost all of the key pieces that I would need to build a Better-than-RhinoCam™, something that I will call the Pentax HippoCam (she's a wide body, baybee!)
My Pentax HippoCam (on paper) offers several advantages over the FotoDiox RhinoCam™:
For starters, I'm building around lenses and mounts made for a 6x7 image circle, not just 6x6 (same as for a 6x4.5). In addition, the Pentax 6x7 (or 67) lenses are quite a bargain. I already owned the aforementioned 165mm f2.8 and a 200mm f4. With my interest being wide panoramas, similar to what one would get on a Hasselblad Xpan™ (only digital), I purchased the well-regarded SMC 6x7 55mm f4. This lens has a reasonable size and weight and uses the fairly common 77mm filter size (which I already use on my Sigma EX 10-20mm f4-5.6). It also has a horizontal field of view of 65 degrees on a 6x7 negative size, which is equivalent to a 28mm on a 35mm film camera (or a 18mm on a Pentax APS-C sensored DSLR). We'll see if we can get it to throw an even larger image circle if unconstrained by the traditional 6x7 body.
The 6x7 body has the body size of the lens mount. It also has the 6x7 ground glass/focusing screen that I can use (like Fotodiox does ) for composing the shot. (Focusing is done while viewing through the camera, not the ground glass). I may be able to go Fotodiox one better and make use of the Pentax 6x7 prism finder (which would allow me to forego the use of a dark cloth for composing the shot).
The Pentax 6x7 is a great design choice also because you have a generous 80mm (!) flange to film/sensor distance. Fotodiox had to use a mirrorless camera like the NEX7 because their multi-manufacturer adapter on the front size eats up a lot of the flange to film/sensor distance, so they must use a thin camera. They can't abide anything with an overshooting prism or grip (like my K-5 II has). I'm designing my Pentax HippoCam to work with my K-5 II, but it will also work with the mirrorless K-01, which has the exact same flange to sensor distance. (My wife owns a K-01, so I will be able to use either - with her permission).
I'm not sure what the dimensions are for the Mamiya RB system, but this would be another relatively inexpensive system with a huge flange to film dimension. If you already own Mamiya 67 lenses, you can apply most of my ideas with your parts... you'll just need to adjust the dimensions.
More to come, regarding the design objectives and the what the HippoCam will accomplish.
A Few Random Thoughts about the Fotodiox RhinoCam™
Fotodiox recently reinvigorated their RhinoCam™ campaign with some new videos and a new special price for people who subscribe to their promotional emails.
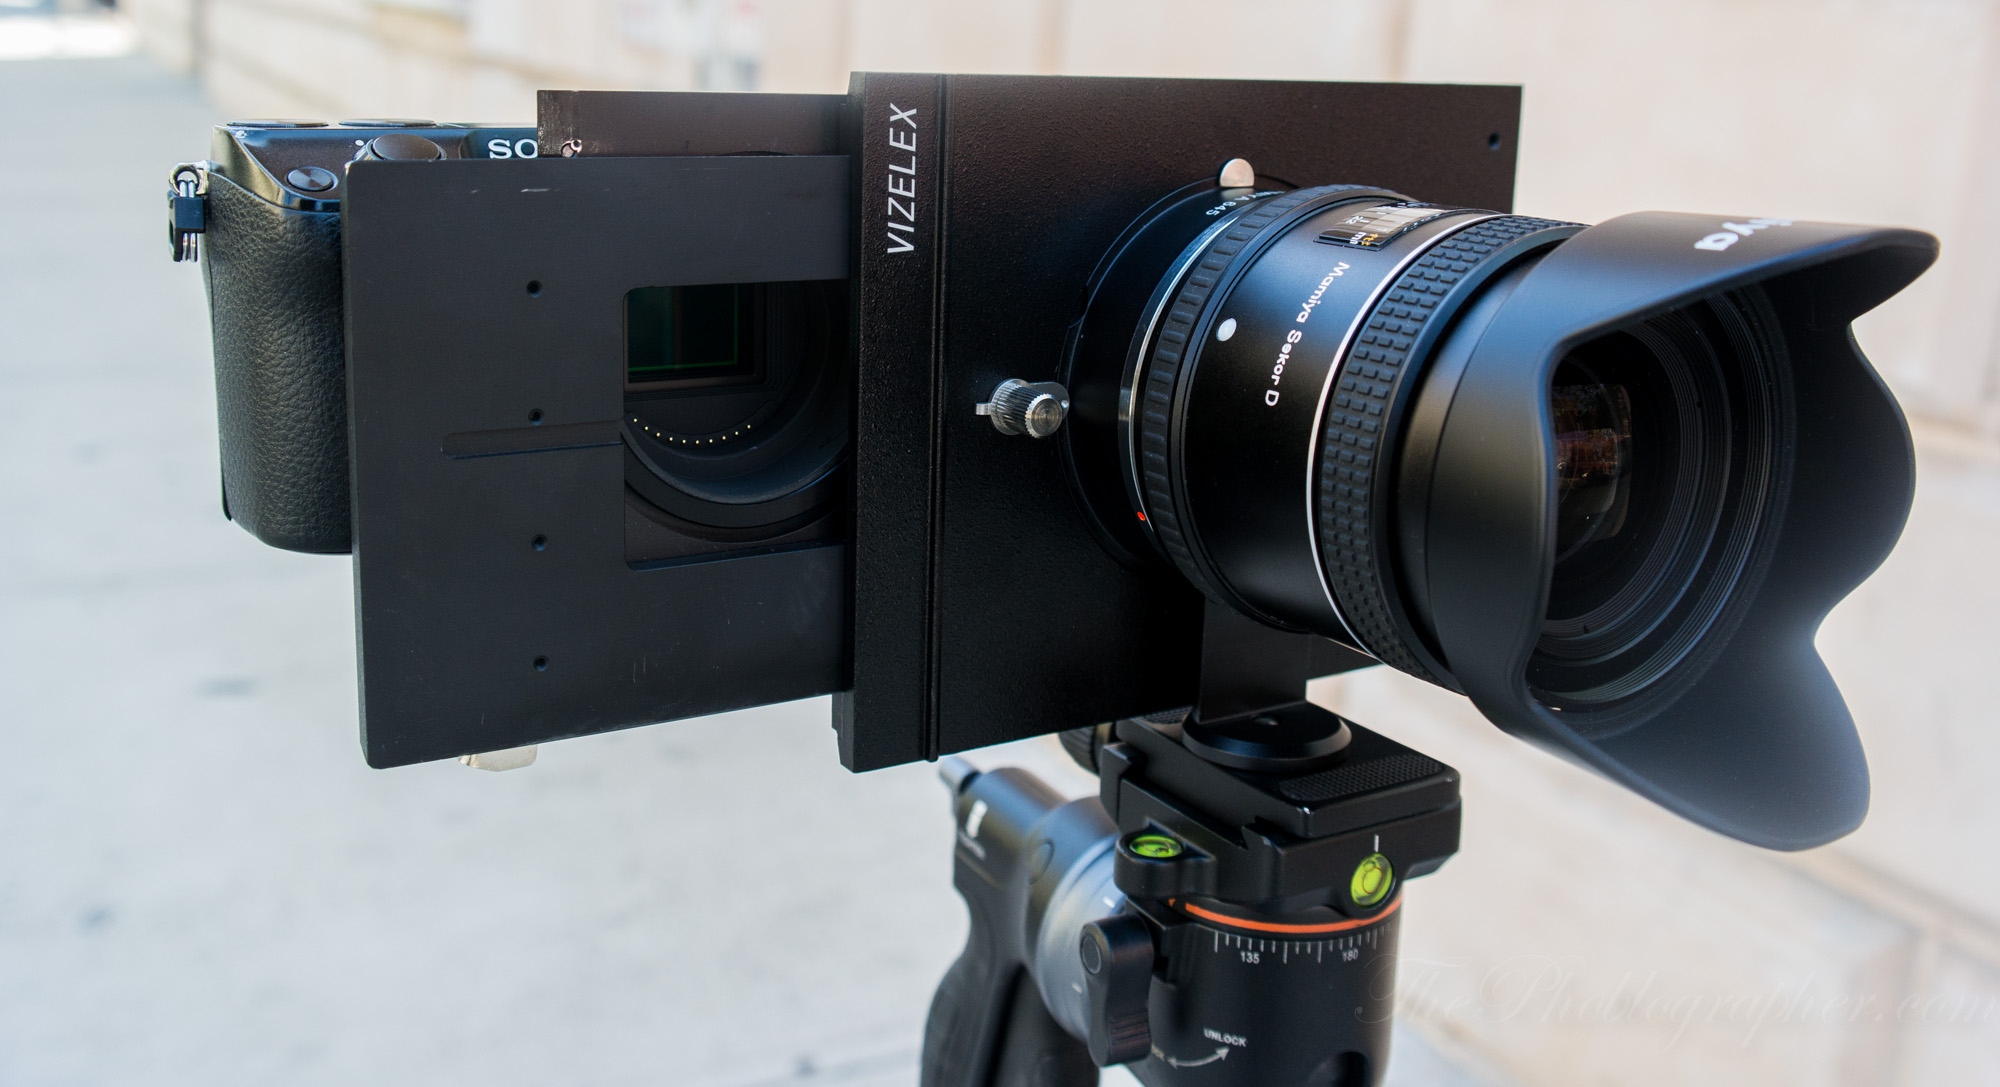
If you are unfamiliar with the RhinoCam™ concept, it is a rather clever tripod-mounted adapter that sits between a Sony NEX7 camera and a medium format lens (which casts a much larger image circle than a 35mm camera lens). It allows you to slide the NEX7 across that image circle, giving you a number of images that overlap a bit. Those overlapped images can be stitched together in Photoshop (or other stitching program) giving you a much larger image - in effect getting something similar to the output of a much more expensive medium format digital back or camera system.
See their video here: http://youtu.be/bZ8YYUFvm50
Firstly, kudos to Fotodiox for their take on the concept. I love the idea of being able to take multiple images across the image circle of a larger format lens.
Now for some random thoughts...
This photo illustrates the biggest design flaw, IMHO. The digital body internals are exposed to the elements when you are composing the image with the focusing screen.
The 2nd thing that I don't like about their design is that, while they made it possible to use with lots of different makers' medium format lenses, they only made it to work with one camera: The Sony NEX7. Now the NEX7 is, by all accounts, a fine camera. But if you don't already own one, the cost of adding one makes this a little bit pricey.
Thirdly, to make this system work with as many different makers' lenses as possible, the system is essentially a 645 system. This makes sense if you want to be able to use 6x6 lenses, like the Hasselblad, or 645 lenses from Pentax, Bronica, or Mamiya. And 6x7 lenses can be used too, but you are still only getting the central 6.24 cm x 4.68 cm (nearly exactly the original film format known as 645 - short for 6 x 4.5).
Lastly, if you want to take a set of images to make a panorama, the RhinoCam™ apparently wants you to use the camera in HORIZONTAL mode. This is a bit silly since, as any panorama stitcher will tell you, you want the sensor in vertical mode to get the most pixels vertically that you can. You control how may pixels wide by how many vertical shots you stitch together.
Here's a RhinoCam™ Video Walkthrough.
Subscribe to:
Posts (Atom)